Hummingbird Recipe box ... Link
Process step by step
For 6” of 4x6” cards
My original box design, I have been making this box style for over 30 years, more than 2000 times.
I have some of the original boxes I made and I can attest to their integrity.
Inner/outer box construction with overlapping lid closure
One piece of white oak, cut into 30 total pieces.
Starting with a select White Oak board 6” x 3/4” x 45”.
I use a band saw to resaw the long board in 2 pieces 6” x 3/8” x 45”
I use a thickness sander to make both boards to 1/4” thick.
Cut Top and bottom from one of each board 6-1/8” x 6”
Then I cut each of the remaining 1/4” x 6” x 38”
Cut a 5/8” x 1/4” x 38” for hinge
Turn RAS blade to 45 degrees and cut a groove in the 38” board.
Cut the 38” board in half and glue together (grooves together)
This becomes the wooden hinge.
Cut and construct the inner box, glued to bottom and top.
Cut and construct the outer box, glued to bottom and top. (Outer box is glued to inner box)
This lamination of wood creates very stable and strong joints.
All sides around box are made with same piece of wood, making the grain flow all around box sides.
I number the boards cut #1 for left, #2 for front, #3 for right, and #4 for rear.
All vertical edges are double butt joints (no visual joints to distract view of the viewers eye)
Butt joints are stronger than miter joints because you are gluing end grain to side grain.
Where by contrast a mitered corner is end to end grain glued.
Also Mitered joints strength are dependent on precise 45 degree angle cuts and the clamping method.
Whereas Butt joints are exact, getting full surface contact with easy parallel clamping every time.
A double Butt joint with 1/4” boards is 0.75” gluing area.
A mitered corner is 0.71” gluing area.
Double Butt joint is 5% more area glued than Mitered and much easier to clamp and assure full contact.
After box lid and bottom are constructed wooden hinge is cut to fit.
This is a continuous wooden hinge made from the same wood as the box.
Much more appealing to the viewers eye, and after you are done, you can say that you made the whole box without buying a metal hinge that someone else made and may distract from the box you made.
For a box 6-1/18 interior width (left to right) 7” exterior I cut the hinge glued into 7 equal pieces 1” long.
Ream each of the 7 hinge pieces with a 3/32” to 1/8” drill so the 1/16” diameter rod will slide easily thru. In this step you are removing mostly glue.
Cut notches out of each end to fit top/lid edges
With wire in stalled, glue the Odd number pieces and glue in place on to top/lid rear edge.
Add thin spacers between the 7 hinge pieces, this allows for glue spread and makes it easier to separate the lid from the top later.
Glue the even number pieces and place on box rear edge
Remove wire
Separate the lid from bottom, using chisel
Drill and glue 4 1/4” dowel reinforcements, two in top, two in bottom
Ream holes thru hinge again to clear where strengthening dowels are.
For long holes I use the hinge wire with the end flattened a little and use as a drill.
Round hinge corners, using belt sander.
Assure box lid opens just past 90 degrees.
Completely finish sand interior and exterior of box.
I use mostly 120 grit for all sanding.
Radius all vertical edges and top with 1/2” radius router bit.
Finish sand again to blend all rounded edges to box where necessary using same 120 grit, which now is more like 220 grit from previous use.
For all exterior surfaces I prefer random orbital half sheet sanders.
For interior surfaces I use boards with sandpaper stapled to it.
Using computer change the desired images and text to a gray color.
Gray color is less ink to Woodburn, causing less fumes and the gray color makes it easier to see where you woodburned and where you have not.
Print out from computer the text and images to the size that you need.
Use spray photo mount adhesive to adhere the paper with text and images to the box.
By hand follow the lines and Woodburn.
Name on lid is in Edwardian script text font, 3/8” tall letters. Small letters require a steady hand.
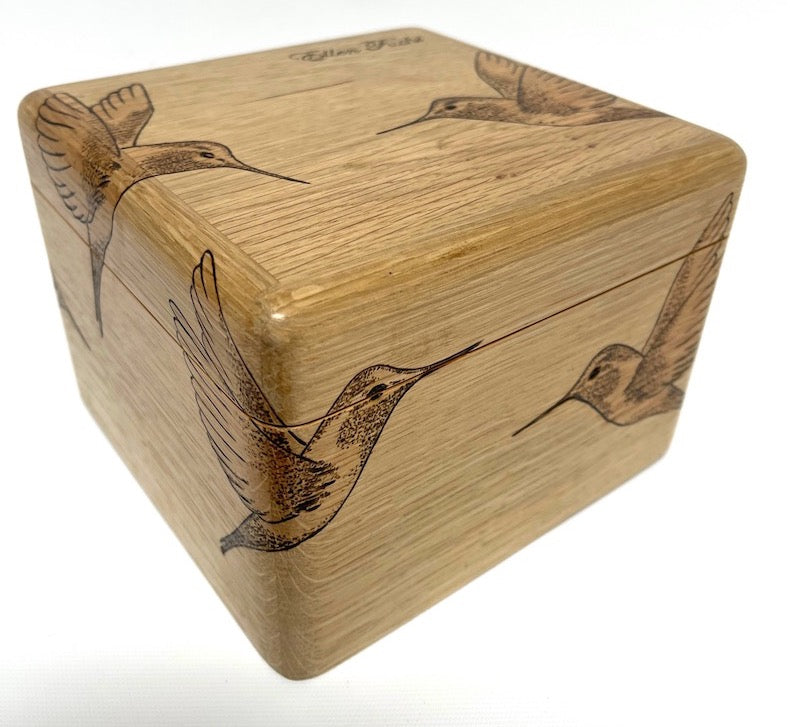
By hand Woodburn 6 hummingbirds wrapped around all 1/2” rounded edges
I start with the outlines and major features of each.
Remove all paper with lacquer thinner
Go over all text and images to fill in and make sure all is pleasing to the eye
For the shading of these hummingbirds I used the point of my woodburner and if you are in to numbers you might find that each hummingbird has 200 woodburned dots.
Colonial maple stain, added to help hummingbirds standout
By hand using same paper process I Woodburned the hand drawn hummingbird sketch on the inside lid (art is from same person who wrote the recipe)
Sprayed Polyacrylic satin sheen
320 sanding grit all surfaces
Sprayed Polyacrylic satin sheen
320 sanding grit all surfaces
0000 steel wool all surfaces
Hand rubbed General finishes satin wax
Wooden Recipe card was made of 3/16” White Oak plywood with laminated oak edges.
First vertical edges glued
Then horizontal edges glued
Both surfaces sanded 220 grit
Edges are same wood as box.
Sprayed Polyacrylic satin sheen
320 sanding grit all surfaces
Sprayed Polyacrylic satin sheen
320 sanding grit all surfaces
0000 steel wool all surfaces
Handwritten Recipe was translated to one color in Corel Draw format and provided to laser engraver.

Made by Glenn Nief
www.TreeToBox.com
![]()